Lately, I’ve been reviewing Shopify drop shipping stores on my YouTube channel. I take a subscriber’s store, go through it, and share ways they can improve and get more sales.
It wasn’t long before I noticed a theme…
Many of these stores needed a lot of work. They were starting from a place that nearly required a complete redesign!
Trust me. I get a ton of questions here at Drop Ship Lifestyle from people that are hesitant because of the site design. They mostly go like this, "Hey, Anton, I want to sign up for your courses, I want to learn how to use your business system, but I know nothing about web design. So how hard is Shopify?"
The process to building a good-looking drop shipping store isn’t complicated. You don’t need to have the best designed, most beautiful Shopify store in the world to make 7-figure sales. All you need is a Shopify dropshipping store that people will visit and see is secure enough to buy from.
Building a Shopify Drop Shipping Store in 10 Easy Steps
It doesn't matter if you're 17 or 71, building an eCommerce store and doing the "techy" stuff can be intimidating for people of all ages…
For the purpose of this Shopify tutorial, I’m going to be recreating Happy Paws, one of our existing demo stores for Drop Ship Lifestyle. Outside of a scenario such as this, I don’t recommend going out there and duplicating someone else’s site.
If you’d like to check out the demo store for yourself, follow this link.
With that being said, I’ve divided the process of building a Shopify drop shipping store into 10 easy steps.
From signing up for a store, to using Shopify apps, and customizing a theme, this guide will take a you from being a Shopify beginner and put you on the path to becoming a Shopify pro!
Step 1: Signing Up For Shopify
It all starts with the first step: you have to actually sign up for Shopify.
By far, Shopify is my favorite eCommerce platform. Since 2013, it’s been the only drop shipping platform we’ve used or recommended.
To sign up for Shopify, you can go through this affiliate link to get a 14-day free trial.
Either way, when you sign up for a free Shopify trial, you won’t be asked for a credit card or anything like that!
Once you enter your email, you’ll be prompted to set a password and name your store (which you can change later). After you submit, there will be a few forms to fill out. Now that you’re done with that, Shopify will do its thing and preload all of the default settings for your new store.
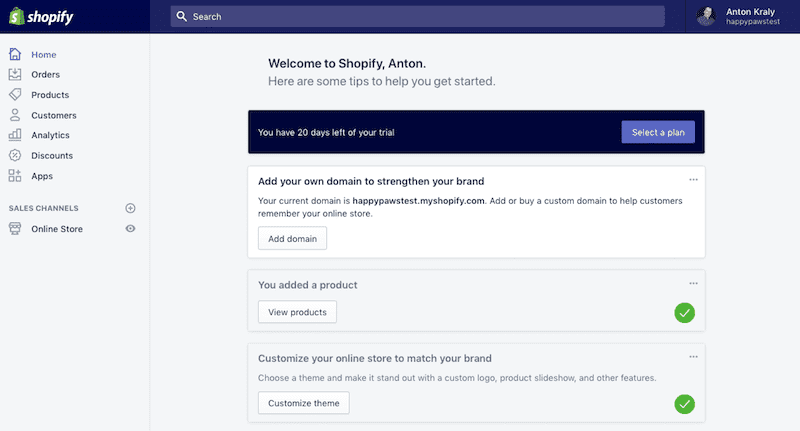
Next, you’ll be taken to your dashboard, where you can access the back-end and front-end of your Shopify store.
TIP
The back-end, or the "server-side", is basically how the site works, updates, and changes. Back-end refers to everything the user can't see in the browser, like databases and servers. The front-end is everything involved with what the user sees, including design and some languages like HTML and CSS.
Your Shopify dashboard will help you run your whole business. Here you’ll be able to
- Build your website (and preview what customers see)
- Accept payments from customers
- Manage shipping options
- Adjust discounts
Now that you’ve officially signed up for Shopify, it’s time to move on to step two. Which is choosing, uploading, and learning how to use Shopify themes.
"Can I use WooCommerce instead?"
At the end of the day, Shopify is geared towards making your dropshipping experience smooth. WooCommerce isn't.
According to BoutiqueSetup, here are some facts that should make your decision easy.
- Shopify has over 4,000 plugins for eCommerce, WooCommerce has just over 1,000.
- Shopify loads in 1.03 seconds in its default form, WooCommerce takes 1.56 seconds
- Shopify features numerous free eCommerce tools designed to make getting started easy
Step 2: Choosing and Uploading Your Shopify Theme
Think of a Shopify theme as a blueprint or pattern for your drop shipping store. However you think of it, you need a theme. This is going to be the layout of what your Shopify dropshipping store is going to look like. From there, you have some options to customize. You can use your images, rearrange the layout, and choose your own fonts and colors.
On the left-side of your Shopify dashboard, you will find “Online Store” under “Sales Channels”. Click that, and and from the menu that drops down, select “Themes”.
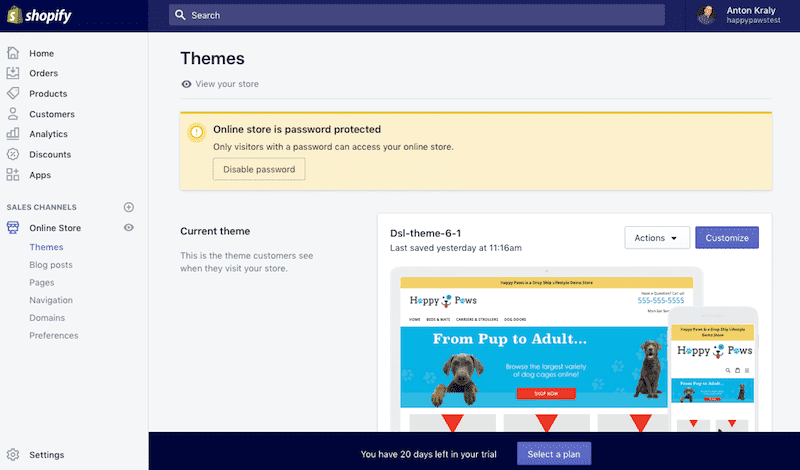
By default, Shopify gives you a them called, “Debut”. If you want to use that one, that’s fine. If you want to use another theme, I will show you how to choose a new one at the end of this Shopify tutorial.
When you're in the theme section of your Shopify dashboard, you can scroll down and explore the free themes or the Shopify Theme store.
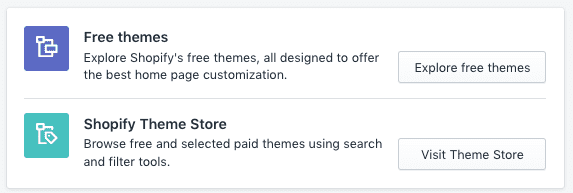
I was actually just at a Shopify developer conference, and you’d be blown away to know how many talented people are out there working hard to design these Shopify dropshipping themes.
If you’re exploring the theme options, you’ll see some are free and some cost money. It’s not uncommon to see an incredible and functional Shopify theme go for more than $100.
If you go through and you see any you like, some of them cost money. So go through, check it out. If you see one you like, you literally just choose it through the store.
You can also just try it out first. Do that by viewing the “demo”. From there you can buy it, and then it will be added to your Shopify store dashboard. Now you select the template, and BAM! Your store’s design will change before your eyes.
For the purpose of this Shopify tutorial, I will be showing you how to build a drop shipping store using the DSL Theme, v6.1.
TIP
If you’re a member of Drop Ship Lifestyle, head to the members area to access this theme. Find the download link in these steps: Members area >> Drop Ship Blueprint course >> Module 3.1.
With any Shopify theme you download, including our DSL theme, you will need to upload the file to Shopify first. This is easy.
Navigate to the section below, “Current Theme”, hit the “Upload” button, and follow the prompts.
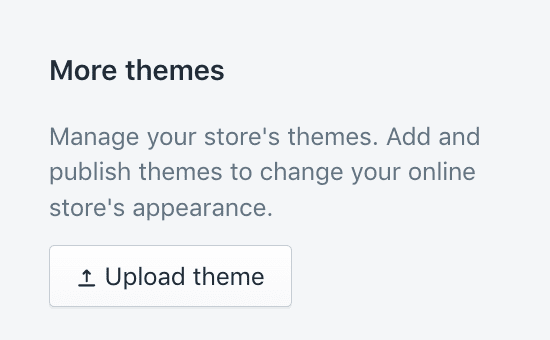
Additionally, it’s important to note that your theme will not be public until you select “Publish”.
Even though your theme is uploaded into your Shopify account, it needs to be customized, which we’ll get to later in this Shopify tutorial.
Step 3: Registering a Domain Name
With your Shopify account created and your theme installed, you now have a good foundation. It’s time to pick a domain name.
For this Shopify tutorial, I will be keeping the name that is automatically set up by Shopify (using the name I choose during registration). But for your real store, you’ll want to register a domain name BEFORE going any further building your drop shipping store on Shopify.
TIP
When you're first setting up your account with Shopify, by default, the domain will be YOURSTORENAME.myshopify.com. In the beginning this is fine, but you’ll want to remove the “myshopify” before it ever goes live.
On the left side column under “Online Store”, you’ll click on “Domains”. From there you will have two options:
- Buy a new domain through Shopify ($14 a year) or,
- Connect an existing domain from a third-party domain name registrar.
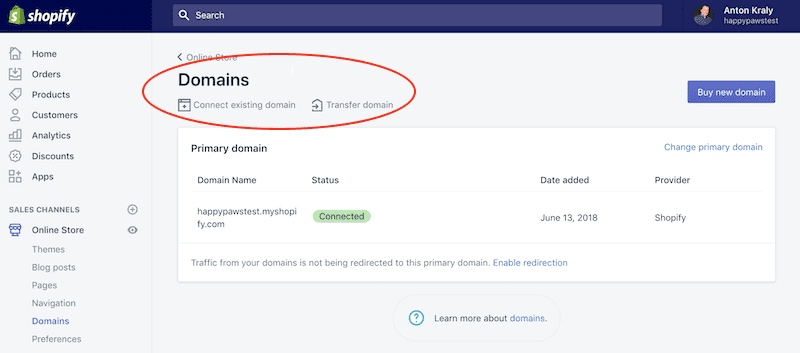
My recommendation if you’re building a drop shipping store on Shopify is to buy a domain name through Shopify. Not only is $14 a year a great price compared to other options, but this option is what’s easiest.
Still, naming and registering a domain for your drop shipping store is very important. If you need any advice or help on how to name your Shopify store, here’s a link to a previous video I created on my Drop Ship Weekly YouTube channel.
Once your domain name is registered, you're going to start to creating collections.
Step 4: Creating Product Collections
Think of collections like categories. In your drop shipping store, you will group the products into collections to make it easier for customers to find what they are looking for.
Our Happy Paws demo dropshipping store has its dog products organized into Shopify collections:
- Crates and Kennels
- Dog Doors
- Gates and Fences
- Carriers and Strollers
- Beds and Mats
- Best Sellers
- Staff Picks
- On Sale Now
To create categories for your drop shipping Shopify store, head to your dashboard and find “Collections” listed on the left under “Products”. Select the purple “Create Collection” button on the right side.
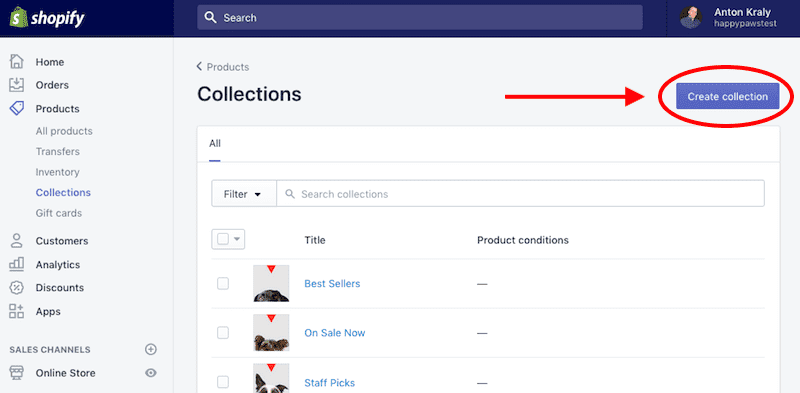
From there, you’ll be taken to a page with all the settings you need to create your collection. After you name your collections and add products, either manually or automatically, you’ll save the collection.
Don’t forget to set a “Collection Image” to be used as the featured image for your collections. This will be displayed in your theme, but I’ll cover that later in this Shopify tutorial.
If you’re a member of Drop Ship Lifestyle and looking for more detailed instructions on how to best set up collections in your drop shipping store, check out the Shopify video course!
One thing you will want to set up in your categories is a product filter. This is a way for customers to filter products by price. Creating product filters is pretty simple.
Create a new collection, called “Under $100” and adjust the “Collection Type” settings as so:
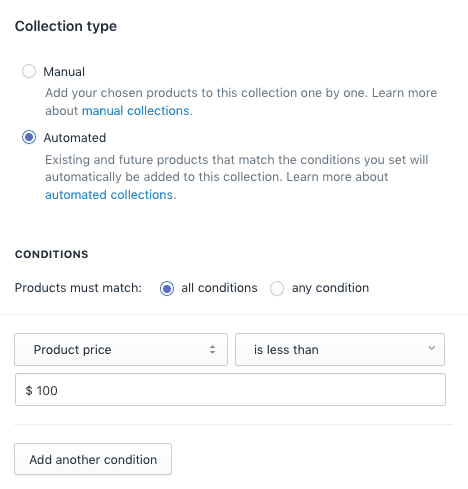
Go ahead and save that. You can continue to set up new collections and add more conditions to filter your products further by price.
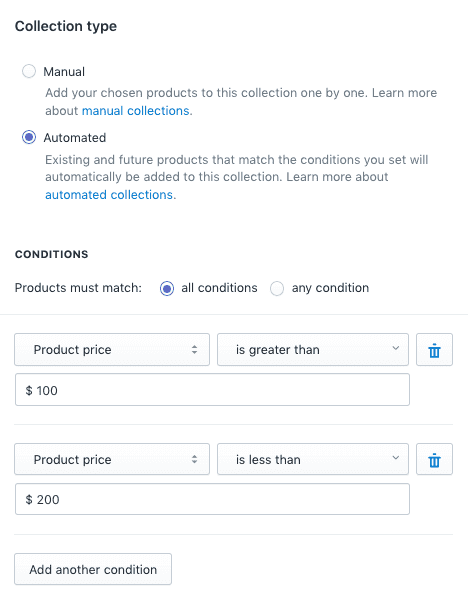
These automated collections are pretty simple and time-saving. Beyond automatically organizing by price you can create automated collections for brands, tags, discounts, and so on.
Plus, you don't have to do this over and over and over again for each new product! You set the conditions once, and then it'll automatically organize them for every new product you upload.
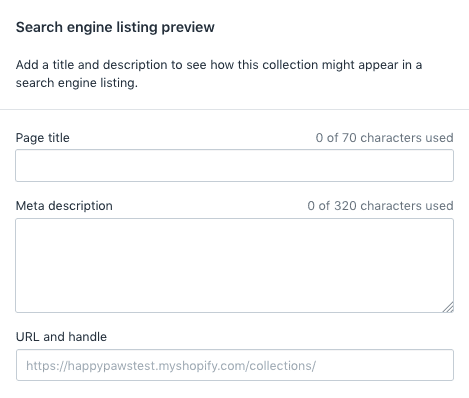
Filling out the “Search Engine Listing Preview” settings for your collections is another important part in the setup of your Shopify drop shipping store.
Honestly, your store’s SEO is an area that can be completed later– when you get something built that functions and looks good. Right now, we are working to just create a store that looks good and functions.
So now that you have your collections set up, it’s time to start uploading your drop shipping products!
Step 5: Uploading Products in Shopify
If you are reading this Shopify tutorial, but already have suppliers and .CSVs sheets of their products, then you’ll want to simply import them that way.
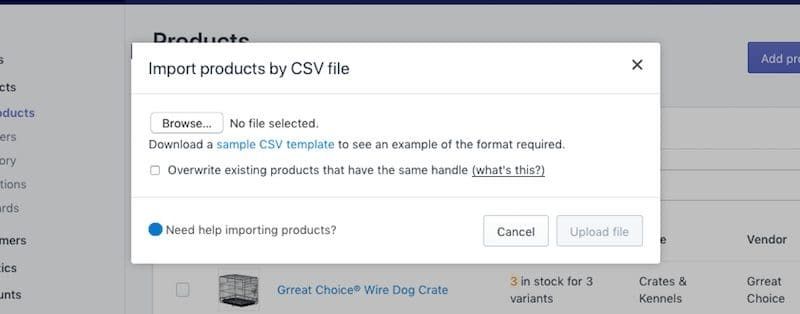
However, if you’re waiting to call suppliers until after your store is built, then you’ll want to add in some demo products.
You’ll need three essential pieces of information about each product:
- Product Name
- Product Description
- Vendor (Brand)
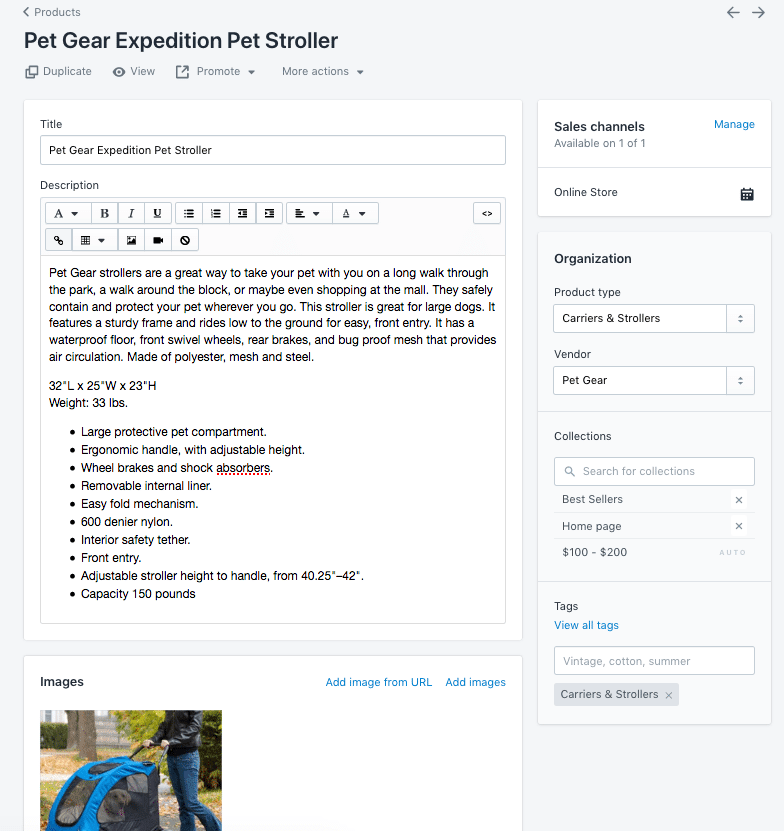
Since you already have your collections set up, you can select a product type under organization. If necessary, the section below allows you to manually add the product into other categories.
You can tag the product however you want in “Tags”, but it isn’t necessary if you’re just getting up demo products.
Then, you’ll upload one or multiple images to give customers a visual of your product.
Once you have everything setup, you should preview how the product page looks in your theme. At the top of the page, under the product title, click “View” to see how it all looks.
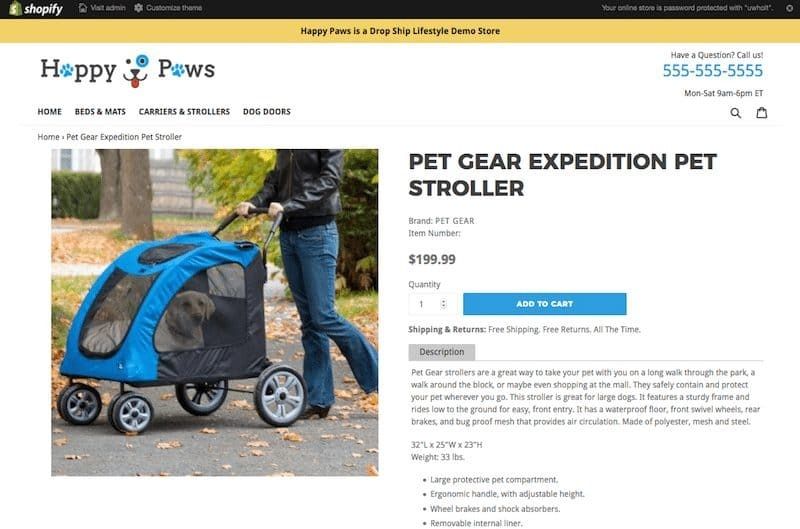
Now there’s no denying that uploading new products is a tedious and somewhat time-consuming process, especially in the beginning. For right now, this covers the basics of adding products into your drop shipping store.
Step 6: Adding Pages and Posts
The next step building our Shopify dropshipping store is adding pages and posts. On our original demo store, you’ll see we have several ‘quick links’ in our footer section.
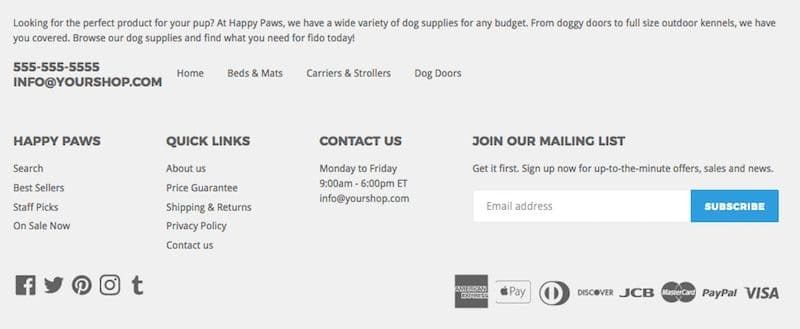
These ‘quick links’ go to our About Us, Price Guarantee, Shipping and Returns, Contact Us, and other pages.
Webpages like these are considered “Pages”. (Different from “Product Pages”)
It’s important to note that posts are different than pages. Basically Posts are blog posts. On our demo site’s homepage, you’ll notice we have a section to show three blog posts near the bottom.

Remember: Posts are blog posts, Pages are content (not a product).
Adding pages to your Shopify store is pretty simple.
From your dashboard, click “Online Store” in the left column, then select “Pages”. This is where you’ll go to add and edit your store’s pages. If you want to add a page, look for the purple button in the right corner that says, “Add Page”.
The easiest place to start creating pages for your Shopify store is with an “About Us” page. This is a page on your store that tells your readers all about your business. Here’s what ours looks like on the demo store: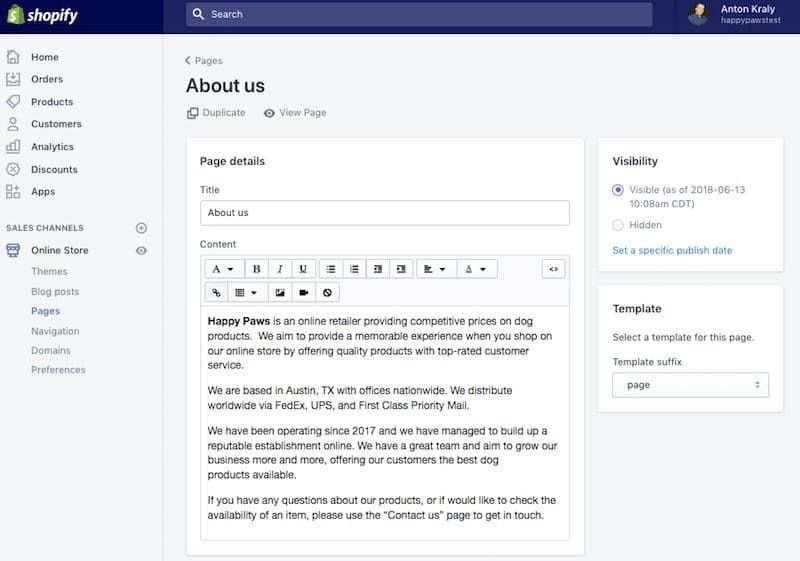
What Pages Do You Need in Your Shopify Dropshipping Store?
I have to confess, I haven’t personally built one of our stores in years. We have a very experienced in-house web designer who also happens to be my sister. She builds and designs our members’ sites.
What’s great about this 21-day free trial is you can go in and just play around with the theme and content. It’s easy to learn. People pick this up quickly.
How to Create Blog Posts for Your Shopify Store
Now that you know what Pages are and which ones you need to create, it’s time to move onto blog posts.
Shopify wants you to actually call your blog something. On our demo store, we called our blog “News”. That is confusing to people at first. You could just name your blog, “Blog”. Additionally, Shopify allows you to create multiple blogs on your store.
Let’s move onto to the blog editor. To create or edit your blog posts, you’ll need to navigate from your dashboard to “Online Store”, then “Blog Posts”.
To edit a blog post, just click on its blue link. To add a new blog post, click the purple “Add Blog Post” button in the upper right corner.
Once inside the editor, you can build and create your blog post. You can add text, images, videos, etc.
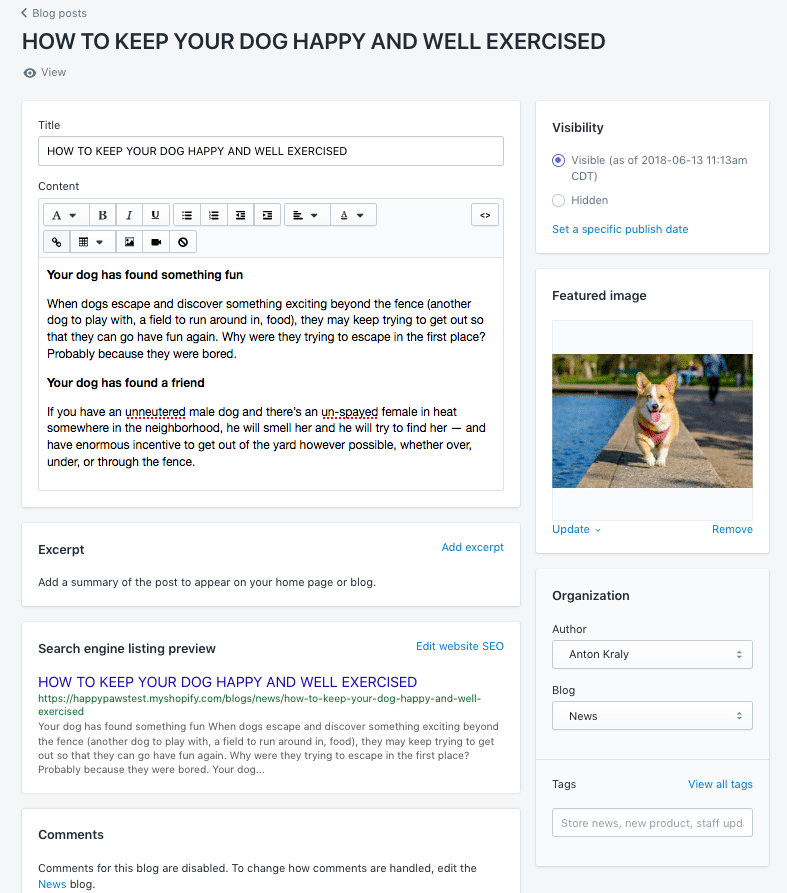
Some other areas to edit before publishing include:
Featured Image: The main image for a blog post, also called a post thumbnail. Think of them as a “face” for your content. Use your own images, or source from a free stock image site such as Unsplash.
Excerpt: Summary of the post to appear on your homepage or blog.
Search Engine Listing Preview: The section where you edit the blog post’s Search Engine Listing with a SEO-friendly Page Title, Meta Description, and URL.
With that being said, we're just going to keep moving forward. We're going to get to step seven already, which is creating menus.
Step 7: Creating Menus in Shopify
After you add products and create collections, web pages, or blog posts, you need to organize them on your online store so that customers will be able to find them. This is when you create Menus.
When you’re setting up your Shopify dropshipping store, it’s important to keep in mind how customers will want to navigate through your products and business information. This will help them make better buying decisions.
Menus are basically structures of what things look like. You choose what pages, products, collections, or whatever else you want to be associated with different menus. Then you can place these menus in various places around your website.
To find your menus, navigate to “Online Store” from your dashboard, then “Navigation”.
As you can see from the screenshot above, I’ve organized everything according to what we’ve done in the previous steps. I’ve organized the product collections from Step 4, the ‘Quick Link’ Pages from Step 6, and even the pricing automation we set up at the beginning. Now you can start to see how fast you can build a Shopify store.
Setting up all these menus is a lot of work in the beginning though. It’s something I don’t like to do myself a lot because it’s very repetitive. Plus, there are people out there, like my web designer, that are much better and faster at setting up a Shopify store. It just makes my life easier to invest in paying for their expertise.
If you’re just looking to get started with the basics of building a drop shipping store and don’t have that kind of money, no worries! Putting in the work and learning how to use Shopify will be a great benefit for you down the road. And of course, there’s plenty of support and free resources out there to help you learn everything you need to know.
Even though we've been doing all this work, uploading demo products, making collections, writing the blog posts, the store still looks pretty generic. This will all change in the next step.
Step 8: Shopify Theme Customizations
Theme customization is the biggest step when building a Shopify store. Implementing theme customizations is a process that will make your store beautiful and functional to site visitors.
Before I walk you through this process of customizing your Shopify theme, know that each theme is different. That means each theme will have different things you will be able to customize.
For this Shopify tutorial, I chose the DSL Theme V6.1. Mainly because of its speed, but mostly because it’s pre-loaded with everything you need for a high-converting drop shipping store.
To start, head to your Shopify dashboard and navigate to “Online Store”. From there you’ll want click “Themes”, then select the purple “Customize” button:
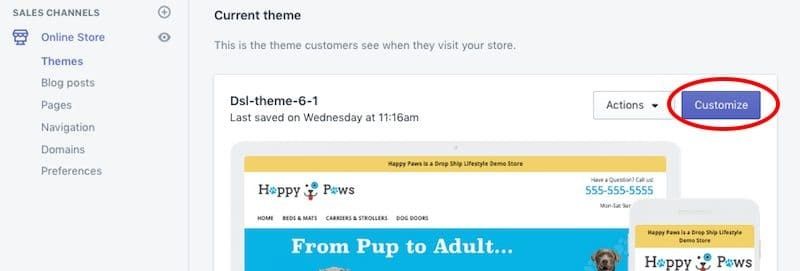
You’ll find yourself in the Theme Editor. This is where you can customize your Shopify store’s content, layout, font, and colors. This page also includes a preview of your store so you can view the changes before publishing them.
TIP
The home page will load first by default. To access the Theme Editor and settings for other pages, select the page type from the top bar drop-down menu.
On the left side are two tabs: “Sections” and “Theme Settings”. You can use Sections to modify the content and layout of the different pages of your online store. Settings are to customize things like font, color, and social media link.
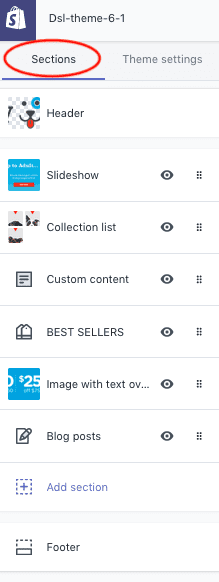
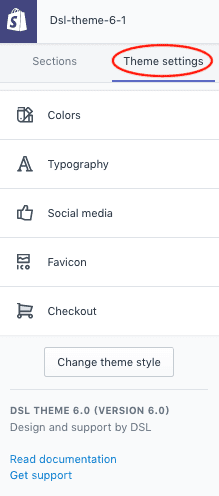

Creating and Organizing Shopify Theme Sections
For this Shopify tutorial, I’ll walk you through the theme “Sections” first.
How to Customize Your Shopify Store Header
We're going to start at the top with the “Header”. Once you click it, you’ll be asked to upload a logo.
If you are building a new drop shipping store you’ll need a logo that represents your brand.
To find the perfect logo, you can use 99Designs, Fiverr, a friend, or do it yourself.
There are plenty of ways to get a great looking logo. Even Shopify has a 100% free logo generator app.
You’ll notice an option to set a menu in your header. These are the same menus we created in Step 7.
You can change, remove, and even edit menus from the “Theme Editor”. Hopefully you’re starting to see how easy setting up a Shopify store can be!
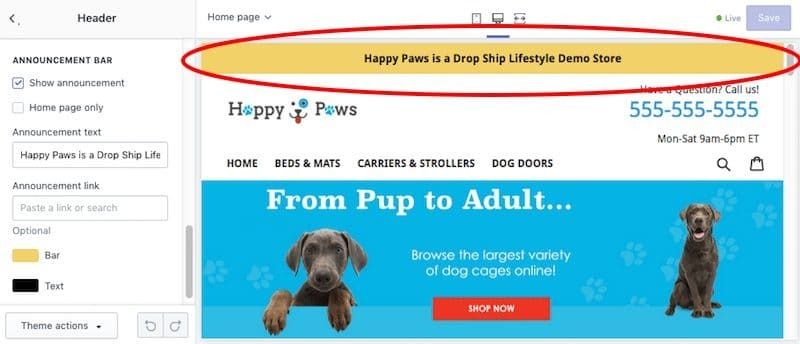
One of the last heading settings is the “Announcement Bar”. An announcement bar is a site wide header bar that lets every visitor see your most important news and deals. It's an incredibly easy way to grab visitors' attention. You can customize the colors to fit your store's brand, but it will look something like this:
TIP
Don’t forget to save your changes every several minutes. The last thing you want is hours of work going down the drain because of some technology mishap.
To start adding sections your page, simply click the purple “Add Section” box to load a long list of options. Here are a few sections you’ll want to add in your homepage to get you started:
Creating Slideshows in Shopify
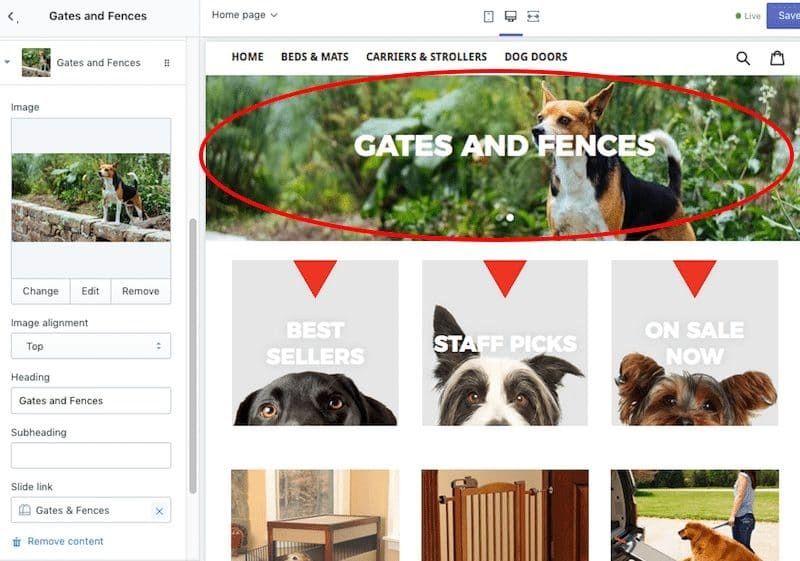
Creating a slideshow is an eye-catching way to show off images and new collections. Shopify makes it easy to upload and adjust the photos you wish to include. There are even options for text overlay (leave blank if you don’t want any text), links, and alignment.
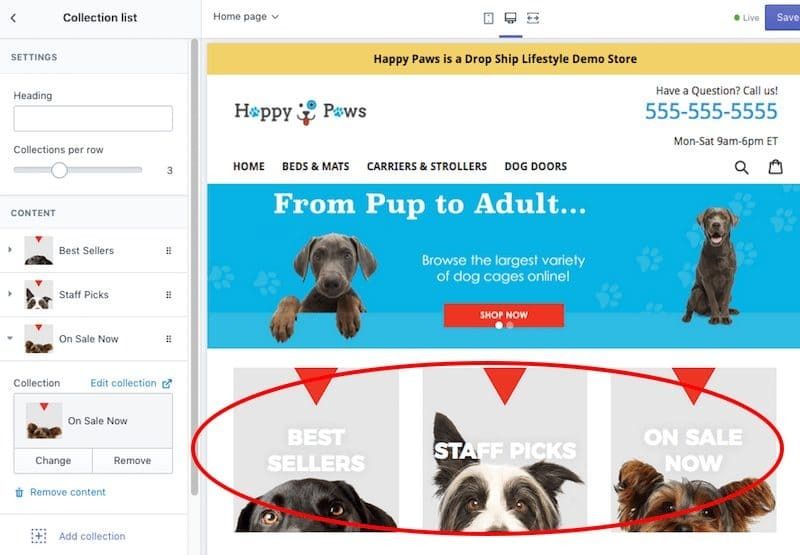
Collection List Settings in the Theme Editor
In the Collection List settings, you can customize and display your collections. For the demo store, we choose to feature our best sellers, staff picks, and sale items. You can edit and customize this section as makes sense for your Shopify Store.
Building Custom Content in the Theme Editor
Depending on what Shopify theme you are using, you might find yourself needing to create a custom content section. This section of the Theme Editor allows you to insert any custom HTML.
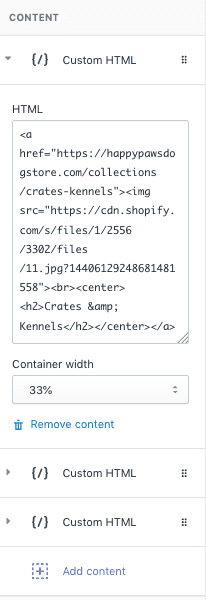
This is where (if at all) things could seem overwhelming or confusing. Sure, this is custom code, but it's also an extremely basic form of HTML.
And I promise you, whether you're 14 years old, or 80 years old, basic HTML is something you could learn quickly.
How to Customize Your Shopify Store’s Footer
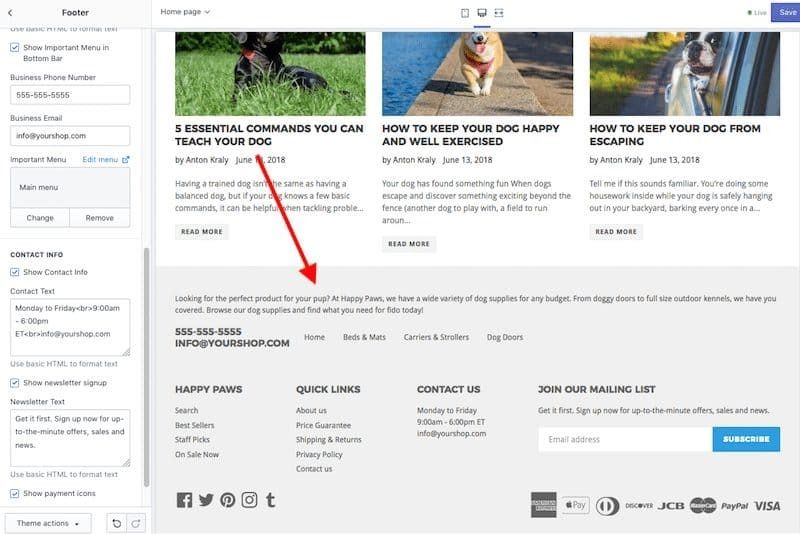
Finally, you’ll want to adjust your footer. This is the section of business information found at the bottom of most web pages. You’ll have options to add menus, contact information, quick links, social media links, payment options, and more.
You can be as detailed or minimal as you wish with what you add in this section. Just keep in mind that you want to make it easy and simple for your visitors to navigate your Shopify store!
Rearranging Your Theme Sections
As you continue to add more sections (like “Best Sellers” and other collections) you might decide to change up their order. Shopify couldn’t have made this easier. Their drag and drop feature is clean and easy to use.
To move your sections, click and hold the six dots on the right side of each section, and rearrange the order as you see fit.
How to Customize Your Shopify Theme Settings
Now that you understand the purpose and possibilities of theme sections, it’s time to talk about the theme settings. Remember, you can use theme settings to make changes to your store's font, colors, social media links, and checkout settings.
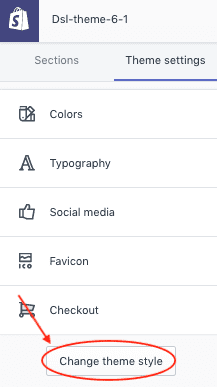
Theme Styles: This is a group of settings chosen by the theme designer that you can apply to your store to give it a professional look and feel. All themes have a theme style applied by default, and you can change this in Theme settings in the Theme Editor.
TIP
When you customize a theme, you are replacing the theme style settings with your own. If you apply a theme style to your theme, then your current settings, such as colors and typography, will change.
Like I’ve said before, with the Theme Editor, it’s best to play around with all the settings to find what works for your theme and store. At first glance, this drag and drop builder might seem heavily-technical, but Shopify has done a stellar job at making it simple and fast.
If you need more proof, you can check out the YouTube video I made along with this Shopify tutorial. I put together a great looking and functional drop shipping demo store in under an hour.
Now, I'm no designer. I'm probably the least technical person there is! But if I can learn how to do this, and do it quick, then so can you.
Even if you do realize you need help building a Shopify drop shipping store, Drop Ship Lifestyle will be able to assist you! Whether it’s customizing your store, designing a logo, or learning how to quickly upload products, we have resources and the expertise to set you up for drop shipping success.
Step 9: Shopify Settings
One of the important steps in finishing the setup of your Shopify dropshipping store is to set the preferences for your site. From your dashboard, you’ll navigate Online Store >> Preferences.
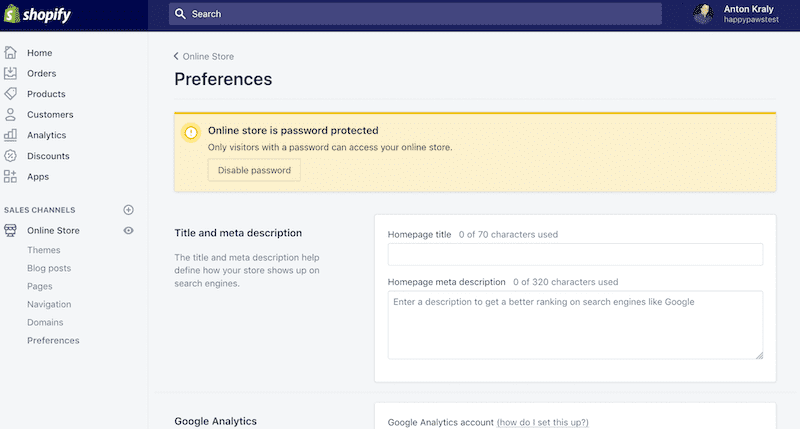
From this section, you’ll be able to add in your Google Analytics codes so you can track visitors and see what they are doing on your Shopify drop shipping store. You can add in Facebook tracking pixels so you can re-market to “window-shoppers” who haven’t bought. Preferences for shipping, taxes, and accepting payments are also located in this section.
Many of the important business aspects of your Shopify store will be in the Preferences section.
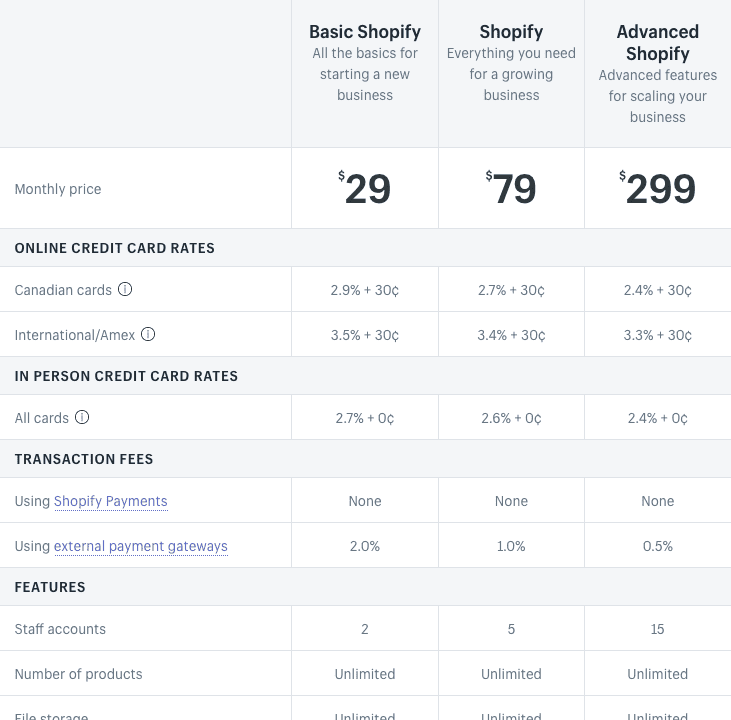
If you want to remove the password protection from your eCommerce store, essentially making it “live”, then you’ll need to sign up for a Shopify plan. There are a few different options for Shopify plans, but I recommend the “Basic Shopify” plan, which is $29 a month.
The Preferences section of your Shopify dashboard has all the important business details of your drop shipping website. You’ll have to consider things like whether you are going to charge for shipping and which services you are going to use. But once you have that answer for your own business, you visit this section to add or make changes to these details.
Honestly, it's all very straightforward. I'm not saying there's not going to be a learning curve when you’re building your first store on Shopify. And I'm not saying web design is a skill anyone can master.
What I can say is that when you’re setting up your Shopify drop shipping store, Shopify makes it easy and clear. Once you know the steps and what’s needed to build a Shopify store, all you need to do is follow the prompts.
There is just one other thing you’ll want to do before taking your Shopify drop shipping store live to the world. And it’s my favorite step...
Step 10: Installing Shopify Apps
At this point, your Shopify store is all set up and ready to start making sales. However, there is one more step in this Shopify tutorial that couldn’t be skipped over: apps!
Just like Apple and Android, Shopify has its own app store. Currently, there’s over 1,200 different apps in Shopify’s App Store. To get you started, here’s our list of the top 16 Shopify apps for drop shipping and eCommerce stores.
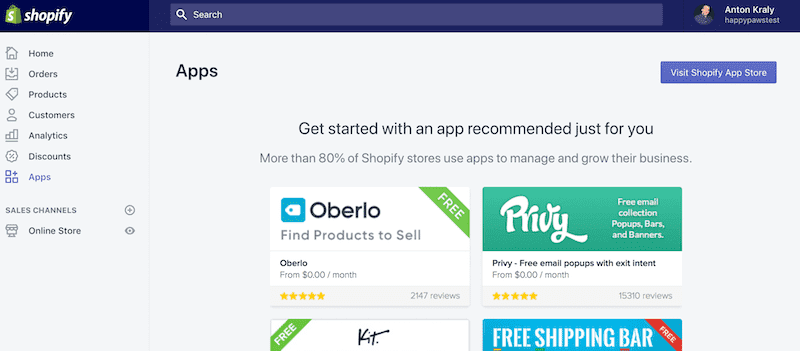
In just a few clicks you add all types of products and services to your Shopify drop shipping site. Shopify has apps (many of which are free!) that can help you with things such as:
Email Collection
Store Analytics
Package Tracking
Order Forwarding
Discount Codes
Live Chat
The process for adding Shopify apps to your drop shipping store is easy and straightforward. You can browse the app store from your Shopify dashboard or from Shopify’s website. When you select the one you need, click the large green “Get” button to have it installed on your site.
TIP
Before installing any Shopify app into your eCommerce store you’ll want to verify that it works and won’t crash your site. To ensure you’re downloading a quality app, it’s always safe to check that the ratings are positive. (More ratings are a sign of the app’s popularity!)
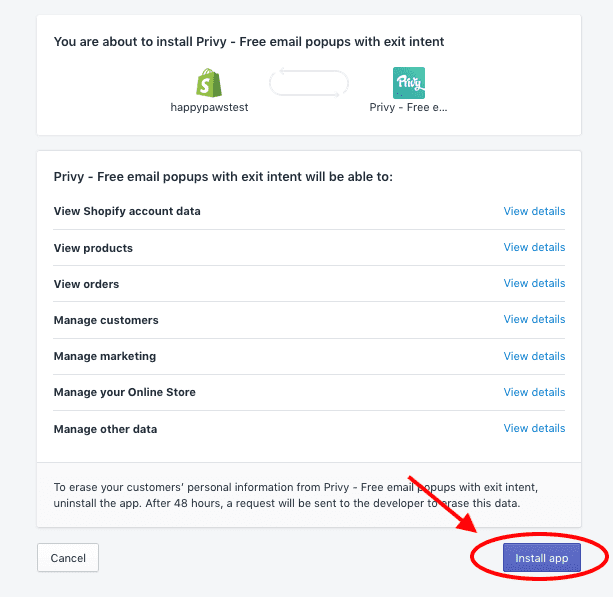
Shopify will then navigate you to a page telling you more specifics of the app. Once you agree to “Install”, Shopify will automatically install the app.
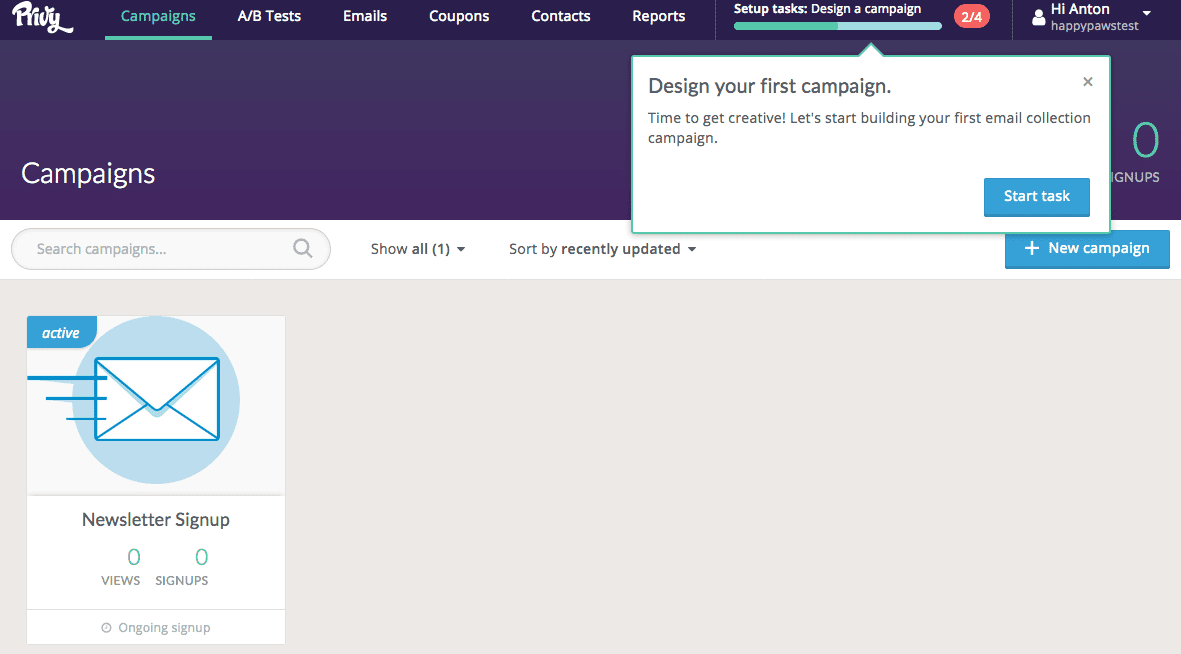
Next, you’ll be forwarded to a page where you can adjust the app settings. Each app will have different settings, and usually come with support or a help forum should you have any problems.
Ready to Build Your Shopify Drop Shipping Store?
To wrap things up, I want to provide this encouragement:
DO NOT PUT OFF building a drop shipping store because of the technical things! You got this! Sure, the tech stuff can be difficult for many of us...including me.
But this doesn’t mean you should throw away starting your own Shopify drop shipping store. Not at all.
The tech stuff will come. I promise. There are we provide for building your own store, and there are also . Just spend a little more time learning the basics, and you’ll have a beautiful site in no time at all.

This is really Nice Information you shared with us appreciate it
Always happy to share, David!
Hi! Anton,
Well, I must say it is a joy to read a site that is not repetitive and has a robot video that prattles on for two hours and has nothing at the end accept a box for your credit card details.
I know I have to get something going and at 69 with having had some serious illness short-term memory is a problem, so a lot of notes are going to have to be written.
This is all very mind blowing and I am needing to get something going to supplement my below poverty pension as physical work is limited these days.
I know you have probably outlined in the above but if there is any positive direction for starting you could give I will be very appreciative. I suppose the first thing is to sign up but I have not seen any cost yet for your course and you obviously do not do this for nothing. I would have to rob Peter to pay Paul so I need to know the cost.
Hi Paul,
Glad to hear that you’re still learning and building new businesses at 69 years of age!
A good starting point would be to join me on a live training webinar that I am hosting this Thursday evening. I will show you how to get started and also do a live Q & A so you can ask me any pending questions that you have in real time.
Here’s the link to register for the webinar:
Drop Ship Lifestyle Webinar
Thank you!
Anton
Anton,
What do you think of buying a ready store. I think it saves time, specially procrastination time. I think sometimes the fastest way to jump in gets the thing moving. I was checking on shopify exchange platform but then today came across bebiggy.com. They are offering turnkey shopify stores at competitive prices. Do you still think I should built my own or buy from them. I’m leaning towards buying.
Hi Az,
Buying established stores can be a good move if you’re an expert marketer and find good value but please DO NOT buy anything advertised as a “turn-key” store.
These are copy and paste websites who are sold to beginners and IMO they’re worth less than $0.
Hope that helps!
Thanks. And also a common question:
should one go with a niche or general store? Particularly if one is a beginner.
Will suppliers of product A be ok and willing to accept a store if it’s already selling completely unreleated to A and also in different niche products B, C, D, etc?
100% a niche store.
This leads to higher conversion rates and better profitability from paid ads.
Is it ok to have similar products from multiple suppliers on your store? Will suppliers themselves be down with that?
Of course! Picture walking into a Dicks Sporting Goods and buying Nike shorts with an Adidas soccer ball. It’s the same thing 🙂
I enjoyed reading these 10 easy steps how to build my own shopify store. But I need to learn more on how to upload and describe suppliers products . By paying,the basic plan of $29/ month,can I start to build up my store?
Hi Rosebella.,
The $29/month plan is more than enough to use when building and running your store 🙂
Here’s our partner link:
Best Shopify Offer
^^ If you sign up through that link you get a 21 day free trial and then save 10% for your first year, and we earn a referral fee. Win-win 🙂
Also, if you want to know more about supplier sourcing and product selection, I’d highly recommend you sign up for the free webinar I’m hosting next Thursday.
Here’s the registration link:
Drop Ship Lifestyle Webinar
Thank you!
Anton
I would love to start.
What’s holding you back, Angel?
Hey Everyone,
As many of you already know I created Drop Ship Lifestyle after selling a network of eCommerce stores and then trying to find a community of other store owners to network with… What I found was a bunch of scammers who promised newbies they would get rich quick by following their push-button systems!
This led me to create a new community along with online training that shares how to build a REAL online business.
I’d love to hear what you think… it’s a 2.5 hour dropshipping webinar designed to help you drop ship profitably… all for free.
Be sure to click here to check it out and send me your feedback!
If you go through the How To Drop Ship Profitably webinar and still have questions just contact me and I will help you out.
– Anton